Unfortunately I did’nt win Jan Betas Commodore 64 Cartridge give away, so I had to build my own. And why not take it to the next level:
- Winbound W27C512-45Z EEPROMs
10 pcs bought on www.e-bay.com from a Top-rated seller. They were bought as used, but working. They shipped in 3 tubes, 2*4 pcs and 1*2 pcs. Strangely enough the 2 pcs in the same tube were defective (the programmer software warned about wrong IDs and was not able to erase them – not even with the ID-check turned off). The price was low and I’ve had them for some time before I found out, so I did’nt complain to the seller - TL866CS Mini USB high-performance universal programmer with 5 socket adapters
I know I could have programmed my EEPROMs with a PC parallel port or an DIYArduino programmer, but I needed a programmer for other projects anyway
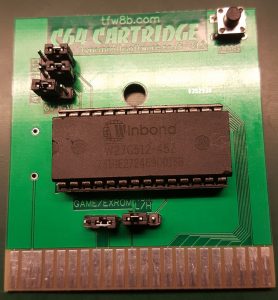
Bought from www.satkit.com - C64 ROM Cartridge
In future projects I’m planning to try to order prototype print online, but I did’nt have the PCB layout and currently have no experience in ordering PCBs online. So i choose to buy something working and even got a plastic case.
Bought from www.TheFutureWas8bit.com
Then the task was simply to figure out how the Cartridge PCB works.
The PCB is delivered with a plastic case, but I don’t use it. I need to have full access to the jumpers and EEPROM so I can re-program it.
WARNING: All the jumpers have default traces on the PCB you need to break before installing pin headers for jumpers. If you don’t need jumpers, you should leave the traces alone so the pins are not floating :-).
Then I made a plan for which ROMs I wanted to put on the EEPROM and at which address in the EEPROM. You could install one ROM per EEPROM, but since all the diagnostic ROMs i found were 8KB and the EEPROM was 64KB it would waste a lot of EEPROM space.
Luckily the A13, A14 and A15 jumpers on the ROM cartridge actually makes it possible to choose 8 different “banks” of 8KB out of the 64KB EEPROM. So in fact the 3 jumpers will choose between up to 8 ROMS of 8KB each.
In the following table “L” or “R” tells if the jumper should be installed in the Left or Right position. Note that hex 2000 is actually 8KB (8.192 bytes).
| EEPROM addr. |
A13-A15 | Game/ ExROM |
ROM L/H |
|
| Dead Test 781220 | 0x00000 | LLL | L | R |
| Diagnostic 586220 | 0x02000 | RLL | R | L |
| Diagnostic 4.1.0 | 0x04000 | LRL | R | L |
| Diagnostic 324517 | 0x06000 | RRL | R | L |
| Doktor 64 | 0x08000 | LLR | R | L |
| (Empty) | 0x0A000 | RLR | n/a | n/a |
| (Empty) | 0x0C000 | LRR | n/a | n/a |
| 1541 Diagnostic | 0x0E000 | RRR | R | L |
I’ve also filled in the Game/ExROM and ROM Low/High configuration as the Dead Test ROM is special: it runs in Ultimax mode at 0xE000 (ROM high), while the other ROMs I use runs in Game mode at 0x8000 (ROM low).
Note that the Game/ExROM jumper probably should have been named ExROM/Game as ExROM/Ultimax is active when it is set in the left position.

Thanks to WorldOfJani for providing the ROMs for download on the blog. Note that you need to burn the .bin file as the .crt file is for Commodore 64 emulators.
Hint: When you load the individual ROMs in MiniPro (the software included with the programmer), it is possible to disabling clearing the programming buffer before loading and also setting the loading address according to the table above.
After burning the ROM, I found that the Diagnostic 324517 did’nt work – the Commodore 64 just started as if no cartridge was inserted. Af re-burning the EEPROM a few times, I realized that the .bin file is corrupt and converted the .crt file to a .bin fil using CARTCONV.EXE from the VICE Commodore 64 emulator. That worked. I’ve added a comment on the WorldOfJani blog about that.
On my to-do list is to create the two different test harness required by four of the ROMs.

