(Long time no see) Echelon/NES Smart Meters – Draft document received!!

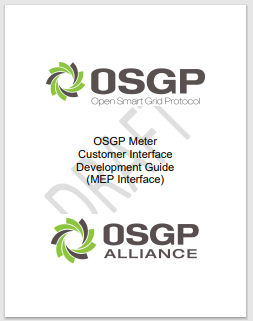
MEP Client Developer's Guide, cover page

Sorry it’s been some time since the last update – but please read the comment sections on the older entries – this project is still kicking, and we try to find time to at least answer the comments.

Let us admit – we were worried… It seems NES went into some kind of radio silence mode during end of 2021 and start of 2022 – but finally in mid January we manage to get a hold on them.

They apologized that the MEP-protocol specifications was delayed – the team simply had to work on other more urgent projects… We fully understand that stuff can get delayed when you are “hit by reality”. After all – this release is for the community, not something a company can pay their bills with :-). And Graves and Gert also have to attend their day job to get bills paid. This is – after all – only a spare time project.

Anyway – NES assured us that it would now get prioritized a bit higher again and hopefully soon be finished.

BUT EVEN BETTER – earlier this week, Gert received a draft PDF with the “release version” of the “MEP Client Developer’s Guide”. This shows us that NES are still actively working on this. Due to the NDA we cannot share much, but you will find an image of the cover page as the featured image of this entry.

It is clear that this is still supposed to be released through OSGP Alliance. Just like promised previously by NES.

A quick glance through through the PDF shows that the document has been revised, even improved a lot. And – more important – it seems that most of the protocol is still in there… So this is REALLY good news. We’ve promised to proof read it a bit and give feedback. But we are really looking forward to be able to link to the release when it is ready.

Sorry for this short – but at least positive – update.

We’ll get back to you with progress on software and hardware soon. And hopefully also soon with some news about the release of the documentation.

Echelon/NES Smart Meters – dabbling the hardware v1.01, v1.02 and v1.03

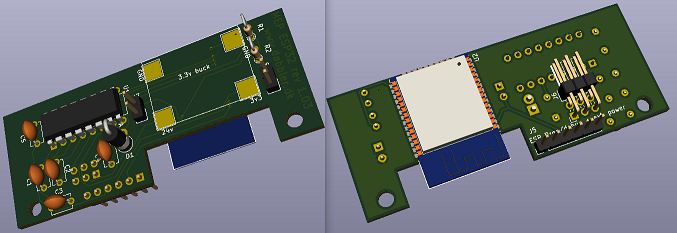
ESP32 MEP 3D

As mentioned in our previous post, we f***ed up the connector to the meter…

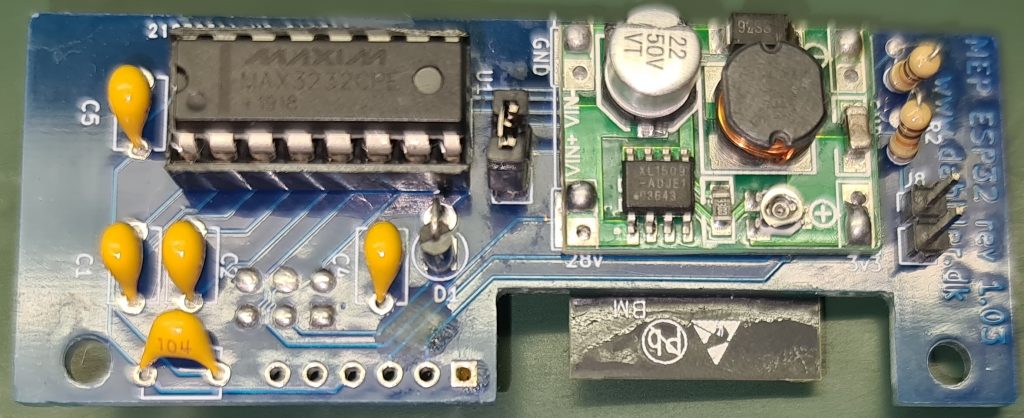
Moving on and with a few other hardware versions that never got produced, we ended up having a version 1.03 prototype where the connector is fixed and that kind of works most of the time in some meters:

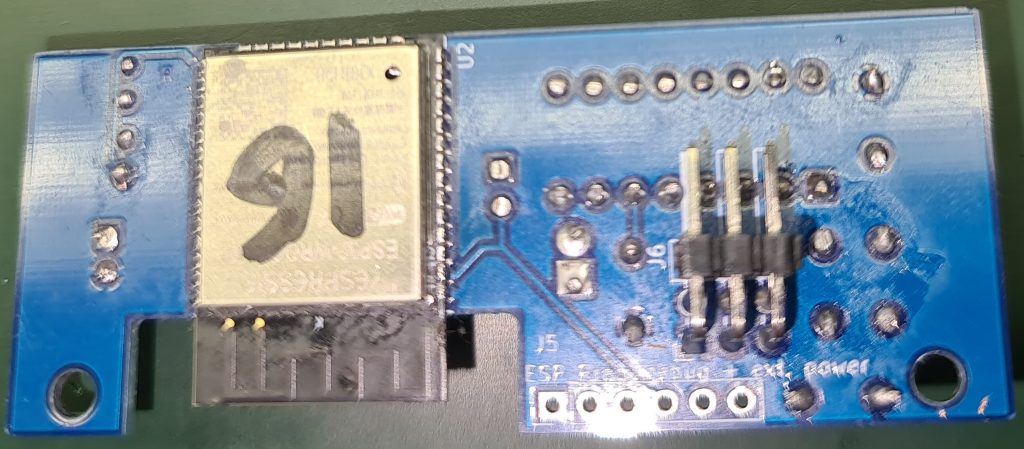
MEP ESP32 version 1.03 – front
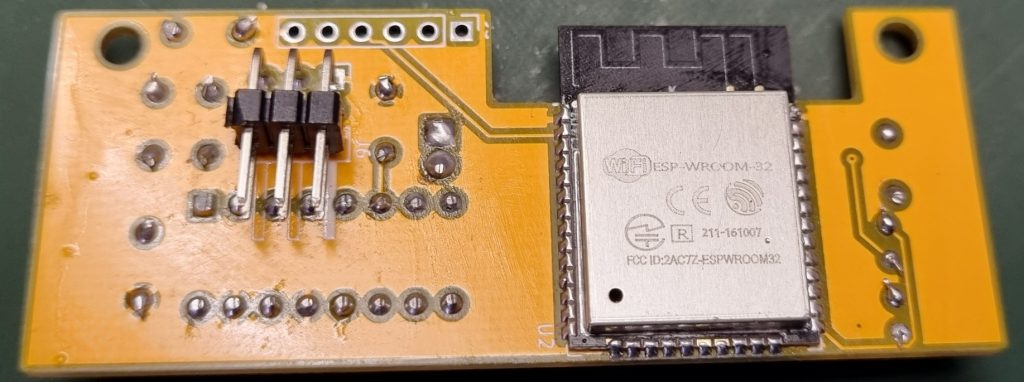
MEP ESP32 version 1.03 – back

Note: jumper for disconnecting power (while adjusting the buck converter) was introduced. And also a “Set ESP32 in programming mode” jumper replaced something we tried to do that never worked :-). The unpopulated 6 pin connector is matching a standard FTDI USB to TTL Serial 3.3v Adapter and can be used to flash or debug the ESP32.

Now we have something kind of working, but are struggling with stability. Which was actually quite a surprise for us. We acknowledge we are mostly software guys, but this hardware is soooo simple – what can really go wrong?


It seems Maxim Max3232 ICs are quite commonly faked in China – and since we buy most of our components in China, we have been struggling with 50 ICs that simply did not work (we got a full refund) and multiple batches that are just misbehaving a bit.

Apparently most of these Maxim Max3232 fakes seems to kind of work, but sometimes when they are powered on and the RS232 pins are connected, the build in boost converter will go haywire. The communication will not work and they will get VERY hot.

If you disconnect, leave the IC to cool off a bit and then reconnect. It will sometimes fail and sometimes work. In some meters it will fail more than in others… A quite intermittent and confusing problem…

You can google this problem – it is quite easy to find others with problems like ours and even with solutions that fixed it for them. We are working on trying out which solution will fix it for us – but this takes time when it sometimes works… And when you think you nailed it, it comes back and bite you in the b**.

Note: If you have any info. on how to fix this issue or issues like this, please let us know by writing a comment. We are for sure NOT electrical engineers and will probably end up creating some kind of software solution for this if everything else fails ;-).

The right (also morally right) solution would off cause be to buy genuine Maxim Max3232 and don’t support the Chinese companies producing fake chips. But the genuine Max3232s are actually quite expensive for “poor” tinkeres like us :-). Let’s see if we can design around this flaw and make something that simply works – even if you use semi working fake chips. After all – it is just another challenge and we started this project to push the limits in the first place…

So for sure, if you want to create hardware from the current design, it is on your own risk. Note: the final solution will also be at your own risk, but this prototype is just even more unreliable than what we usually create :-).

Disclaimer: We cannot be held liable for anything written on this site – even if you set your meter, yourself or your building on fire!

Off cause you also won’t have much use for it before the MEP documentation or our software is released.

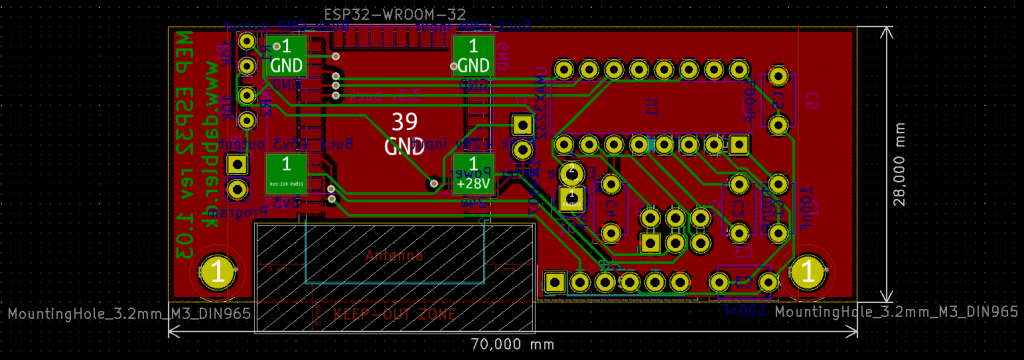
Anyway – the current unpopulated prototype PCB looks like this:

ESP32 MEP in KiCad’s PCB Layout editor

As we chose to use thru hole components we are kind of “out of space” (which is defined by the size of the “drawer” in the meter). So we are considering pushing our soldering skills and going to SMD components to get more space… Maybe in a future prototype?

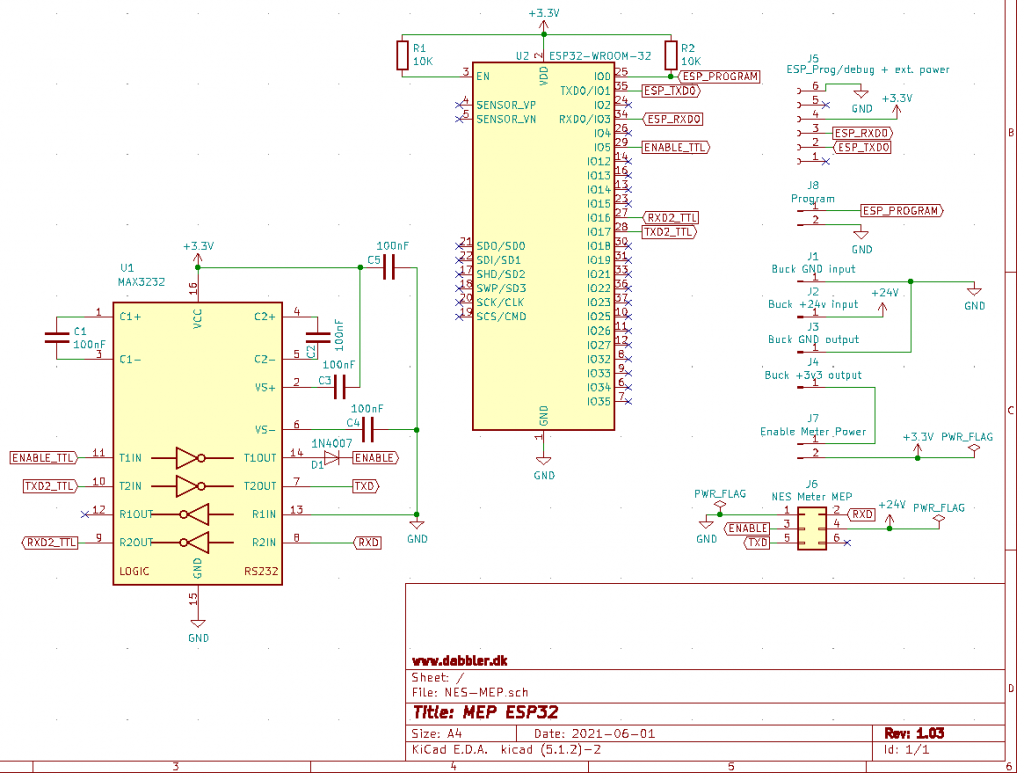
The current schematic (without any fixes for fake Max3232s) looks like this:

ESP32 MEP in KiCad’s Schematic Layout editor

Warning: The schematic still have the wrong pin numbers for the MEP connector, so don’t trust those! The wiring is correct, but the pin numbers shown are not!

The Max3232 is more or less setup like the reference diagram in it’s datasheet. So not much to explain there (the capacitors are used for the build in boost converter converting the 3.3VDC to the +/- DC voltages needed for RS232 signals).

A Max3232 got two sets of receive/transmit logic. We currently use the first set for the actual communication with the meter, and (mis-)use the second set to set the Enable pin high towards the meter (it might not be exactly +5VDC or +12VDC, but it works). To prevent the Max3232 from setting the Enable pin negative, we have a diode in there (not that we know for sure it is needed 🙂 )… We currently have no use of the receiver part of the second set of the Max3232 receive/transmit logic, so it is just grounded on the RS232 side to prevent it from oscalating.

The resistors connected to the ESP is just to make the initial flashing through the J5 connector work.

Nothing real fancy going on in the schematic as far as we are aware :-), but as mentioned a few stability issues with some meters… So we are trying out different solutions for that.

Btw: if anyone need a copy of the current KiCad project while we wait for something better, feel free to e-mail us. We’ll be happy to share it, but prefer not to put it up for download until we have sorted out the hardware bugs…

Unfortunately the software is covered by the NDA, so we cannot share that yet… So you really have no use for the hardware at this point in time…

As soon as we are released from the NDA with NES, our plans are still to make both hardware and software fully available to you … on this dabbler.dk-blog.

Stay tuned!

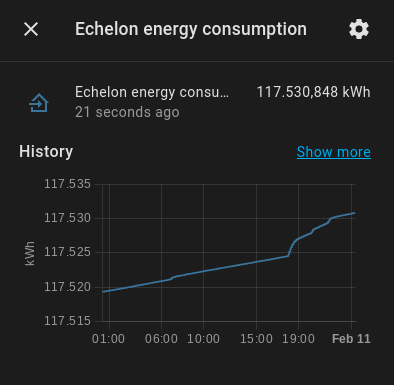
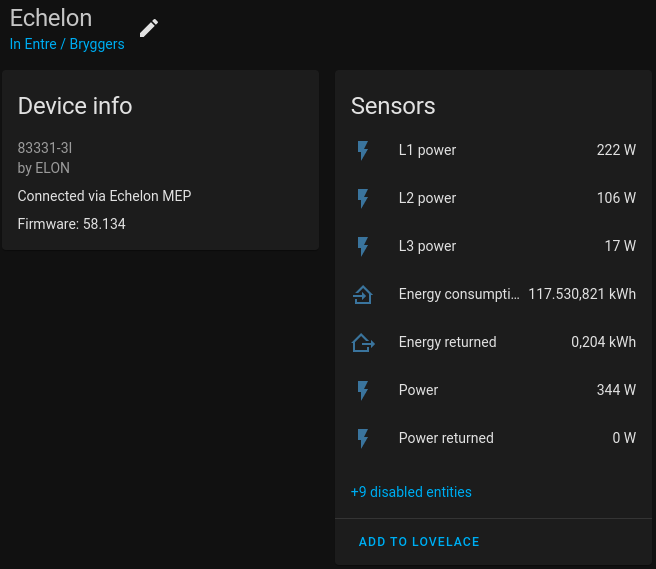
Let us finish with a sneak preview of a few decoded meter answers from our software:
Note: Our added comments are formatted with italic. L1 L2 and L3 is the name of the 3 phases measured by the meter. *’s are replacing the stuff we are not allowed to share yet due to the NDA:

0x** Invalid sequence number (this is normal for 1st request)
The meter returns the sequence number to use for the following requests with this error

0x** Successful response
This is some initial reading of the meters setup. It is required to decode some of the other messages correctly.
Flags 0: 0b00000011
Flags 1: 0b00001100
No. of Self-reads: 12
No. of Summations: 11
No. of Demands: 0
No. of Coincident Values: 0
No. of Occurrences: 0
No. of Tiers: 0
No. of Present Demands: 0
No. of Present Values: 55

0x** Successful response
Manufacturer: ELON
Model: 83331-3I
Version: 58.134

0x** Successful response
This response is about aggregated consumptions.
The meter’s display was showing: 115921 kWh when this was received.
This household is NOT producing electricity, so the 201Wh might be from when the meter was initially tested?
This response contains far more values than the ones we chose to decode.
Fwd Active Wh L1L2L3: 115921469
Rev Active Wh L1L2L3: 201

0x** Successful response
This response tell us about the current consumptions etc.
This response contains far more values than the ones we chose to decode.
Fwd Active W L1L2L3: 701
Rev Active W L1L2L3: 0
Import Reactive VAr L1L2L3: 139
Export Reactive VAr L1L2L3: 0
RMS Current (mA) L1: 1536
RMS Current (mA) L2: 1874
RMS Current (mA) L3: 139
RMS Voltage (mV) L1: 232591
RMS Voltage (mV) L2: 233879
RMS Voltage (mV) L3: 234387
Frequency (mHz): 50000
VA L1L2L3: 822
Power Factor L1 (1/1000): 875
Power Factor L2 (1/1000): 836
Power Factor L3 (1/1000): 837
Fwd Active W L1: 311
Fwd Active W L2: 366
Fwd Active W L3: 25
Rev Active W L1: 0
Rev Active W L2: 0
Rev Active W L3: 0
RMS Voltage (mV) L1 – Continuous: 232507
RMS Voltage (mV) L2 – Continuous: 233922
RMS Voltage (mV) L3 – Continuous: 234246
RMS Voltage (mV) L1 – Average: 232185
RMS Voltage (mV) L2 – Average: 232990
RMS Voltage (mV) L3 – Average: 234229
Average Fwd Active W L1L2L3: 701
Average Rev Active W L1L2L3: 0
Average Fwd Active W L1: 311
Average Fwd Active W L2: 366
Average Fwd Active W L3: 25
Average Rev Active W L1: 0
Average Rev Active W L2: 0
Average Rev Active W L3: 0

0x** Successful response
Utility Serial Number: 4080******(digits removed manually on this blog for security reasons)
Image CRC: 55331

Echelon/NES Smart Meters – dabbling the hardware v1.00

Unfortunately we are still awaiting the release of the MEP protocol from NES (Networked Energy Services) as mentioned in previous blog entries. This will release us from the Non-Disclosure Agreement (NDA) keeping all this a secret to you.

…but while we wait, we could introduce you to our hardware prototype.

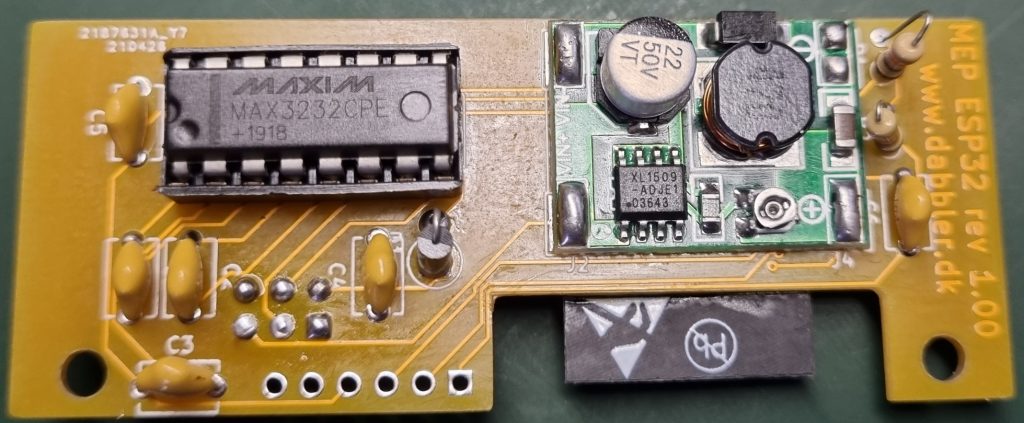
MEP ESP32 version 1.00 – front
MEP ESP32 version 1.00 – back

In our first few attempts we got the connector totally wrong.

Apparently the footprint we used while doing our PCB design numbered the pins 2 columns in 3 rows, while NES numbered them with 3 columns in 2 rows:

Our pin numbering f**k up

Naturally we messed that up! Luckily we actually did some sanity testing before just inserting this prototype into the meter, and we did discover the error and simply connected with some wires to quickly fix it.

We wrote about the pin connections previously, but just to recap:
Pin 1: Ground
Pin 2: Enable. Set to +5VDC or +12VDC to tell the meter the MEP interface is active
Pin 3: TXD (meter’s serial receive pin)
Pin 4: RXD (meter’s serial transmit pin)
Pin 5: Power. +24 or +26VDC (max 1W) from meter
Pin 6: Not used / no connection

Note: It depends on the hardware model of the meter if pin 5 supplies 24 or 26VDC.

Due to the wires, we could move on with the software… While awaiting a new prototype PCB from JLCPCB… But let us explain a bit about the hardware prototype:


The ideas behind this hardware are quite simple:

  • The ESP32 is a 3.3VDC device, it needs the voltage from the meter reduced in an efficient way as we need the 1W it can deliver (we use a Chinese buck converter to keep it simple).
  • We need to be able to program the ESP32 in circuit (so we don’t need to program it before soldering it / de-solder it if something goes wrong). So the primary serial interface of the ESP32 is routed to the unpopulated 6 pin connector at the edge of the print.
    To program the ESP32 we need to put it in programming mode. The resistors and capacitor next to it is for that…
    Luckily the ESP32 also have a second serial interface we can use to communicate with the meter now we use the first one for debugging and in circuit programming.
  • The meter is RS232, the ESP is 3.3VDC TTL – so how do you convert that? A Max3232 can do just that, it is 3.3VDC too (it got a Max232 brother that is 5VDC). It has a built in boost converter that boosts the 3.3VDC back up to the signals level of RS232.
    The capacitors surrounding it is for this boost converter.
  • The meter also requires a Enable pin to be set high. Luckily the Max3232 got a second receive/transmit logic. We can just use the second transmit logic to make an Enable pin controlled by the ESP32. Only problem is that is should probably not go negative (like RS232 will), but we fix that with a diode.

Not much to it – or is it really this simple?

Stay tuned for an update on the next hardware version of ESP32 MEP…. Coming to www.dabbler.dk real soon now…

Echelon/NES Smart Meters – NES to the rescue

Networked Energy Services logo

As mentioned in our previous post, we we stuck. We had a 3rd party module which were clearly communicating with the meter through RS232. We knew the hardware interface, but we had no idea about the protocol…

In pure desperation we opened a support ticket with the current owner of the technology – NES (Networked Energy Services). We did not expect any feed back – or at least no help. Surely they know the port and the protocol, but we did not expect us beeing able to reach out to them directly… We more or less expected that they would simply redirect to our power company or power grid/meter owner…

In fact they responded positively to our request, and soon setup a teams call between us and a Senior Vice President. During the meeting they simply wanted to know if we were tinkering or doing a commercial product, but as soon as it was established that this was in no way commercial, they were prepared to offer their full help.

Apparently NES is working on opening the reading part of the protocol up, so our timing was perfect. Unfortunately they were settled about how to do this and how to approach it. So they needed us to sign a Non-Disclosure Agreement (NDA) to get access to the full documentation. As the NDA only covered un-released documentation, they promised to work on figuring out how and what to release asap so the NDA could be lifted. While writing this, we have received the finished documentation for the IR-interface (which we cannot use for anything in Denmark as N1 claims it is fully encrypted, and N1 will NOT release the encryption keys due to security considerations). Also we have received a preliminary draft of the MEP documentation, so we trust this WILL in fact be released soon (according to NES the deadline is Q4 2021).

We can reveal a few things about the protocol – which is more complex than we expected. The meter has around 80 tables you can read and/or write to and around 30 procedures you can call (individually and/or as part of an atomic transaction). We are told not all tables and procedures will end up in the public documentation, but the full protocol supports stuff like: writing to parts of the meters display, report data from other meters via MEP and let the meter report it to the grid. Let the grid send firmware/files to you module. Read out all aspects of the power delivery – like consumption, quality, outages etc. The meter can even send and receive alarms if something unexpected happens or ask you for measures if you configure it to include data form other meters (i.e. water, heat etc.) in it’s reports to your net company…

If this was just a matter of only allowing reading from the meter it would be simple, but unfortunately some of the reading required setting up stuff and writing procedure calls to tables… And the reading the results from other tables. So it is far from simple and NES need to make sure that the parts released is just enough without beeing too much…

Note: although MEP is unencrypted a password is needed. There are 3 levels of security in the MEP protocol. The password is used as part of a digest (checksum) calculated on the data packages and reply. It is used to make sure the requester has the proper access, but also that the sent and received packages are not corrupted during transmission.

  • No key required: The lowest level of security. Don’t give access to much
  • MBK: MEP Basic Key (MBK), formerly also known as Base Encryption Key (BEK)
  • MAK: MEP Advanced Key (MAK), formerly also known as Open Media Access Key (OMAK)

These keys should be provided by your power network operator (i.e. N1). Those are the ones owning your meter and the cable to you house.

Regarding N1 they are only willing to give us the MBK, but it is fine as it can be used to read most values from the meter. We were told that the MBK is shared between meters, while the MAK is a individual key per meter.

If your power network operator is N1, the procedure is to ask the power company (the ones you actually buy your power from) to ask N1 provide the read-only key for reading out power consumption electronically (they can do this by using a N1 webform created for this purpose. You also need to provide your name/address, and probably also installation no. and meter no. And off cause your e-mail address.

At the time of writing this is the current state of the project:

  • We have a full documentation of the MEP protocol – which we unfortunately cannot share due to the NDA. NES is working on sharing part of this, which again will allow us to share our code!
  • We have a partial documentation of the IR protocol. NES is working on publishing this too so we can link to it. According to N1 it has no use in Denmark as the IR communication is encrypted and they won’t release the keys.
  • We have a working MEP-prototype hardware with an ESP32
  • Although our software is still work-in-progress, we have all the pieces to the puzzle and are able to send requests to the meter (or at least most of them) and get meaningful replies back from it. Due to the NDA we are NOT able to share the software at this point in time

Rest assured that we will share the software and related knowledge/hints as soon as the NDA is lifted… Follow our blog to get notified when this happens…

In the meantime we could probably soon share our hardware… Stay tuned 🙂

Echelon/NES Smart Meters – the secret interface

Echelon/NES meter bottom

www.sommerhack.dk 2020 renewed our interest in communicating with our Echelon meter. During a session by Thomas Ljungberg Kristensen, WelcomeSecurity (https://www.welcomesecurity.net/) the different possibilities and the legislation was briefly covered and he inspired us to push harder to get some kind of access.

If you are following these posts, can read Danish and have a Smart Meter you would like to connect to – this page (created by Georg Sluyterman) might be of interest to you: BefriDinElmåler.dk.


As mentioned in the previous post we already started the process of getting further information from N1. The useable information was sparse and hidden in a lot of mis-information, but in hindsight we know that this was probably not on purpose, but simply because the N1 organisation and staff did not have the full picture of the solutions and/or simply did not know better. This simply seemed to be new to everyone involved…

N1 confirmed that the IR solution was encrypted and there were no way they could supply us the encryption key. Supposedly there were a hidden port behind a cover at the bottom of the meter, and we should purchase a “Izar / M-bus PCB” for it. We were a bit skeptical, but did find a hidden 6 pin interface in a plastic drawer on our meters… So it seems there were some truth to this…

N1 told us that a company called Develco had been involved in the developments, but had sold off the solution to an unknown 3rd party… Gert discussed a bit with N1 if they could claim that we could simply order this PCB, when it was nowhere to be found and they could not tell us where we could buy it… Is something REALLY for sale when you cannot buy it? 🙂

After researching this further Izar and M-Bus interfaces seemed to be a dead end… But researching “Develco”, hidden interfaces and solutions further we found this! (local copy of the PDF can be opened from here if the external link ever disappears)…

But wait a minute – this document does not mention “Izar” nor “M-Bus”!!! Insted new terms like “Multi-purpose Expansion Port (MEP)” and “ZigBee” is introduced. What the heck is a MEP port?

According to the document the Danish company Develco was actually involved in a project with EnergiMidt (parts of EnergiMidt are now N1) and NES (Networked Energy Services). And apparently as part of selling all these Echelon Type 83331-3IAAD (and similar model) meters in Denmark, a new plastic cover was developed providing access to the MEP screw terminals from a small “drawer” in the meter! It seems this solution is available for most (if not all) Echelon Type 83331-3IAAD (and similar model) meters in Denmark.

Unfortunately it was very hard to get in touch with Develco. We tried multiple times writing them, calling them etc. Finally Graves managed to convince a sales guy that we represented a company interested in purchasing SEVERAL PCBs to follow multiple plants power consumption more closely…. Only to discovere that the PCB never was produced as anything but a prototype / proof of concept… They would be happy to start production up for us , if we would only place an order of of 10,000 pieces or so…. Yet another dead-end…

The MEP “drawer” is well hidden. We did not know it was there before we found this document. As far as we know other tinkers investigating this also did not find it (or at least the few we spoken with afterwards didn’t know about it). This is simply a well hidden “secret” in plain sight. It looks like part of the cover, but it is actually a separate piece of the plastic you can pull out and it is prepared to receive a small PCB that connects to a 6 pin standard 2.54mm pin header. When you know it is there, it is obvious – we just didn’t notice it previously…

We tried to investigate the 6 pin interface, but it is hard when you have nothing communicating on it – and no idea what exactly to look for. If we could just open the sealed meter to reverse engineer – but that is illegal.

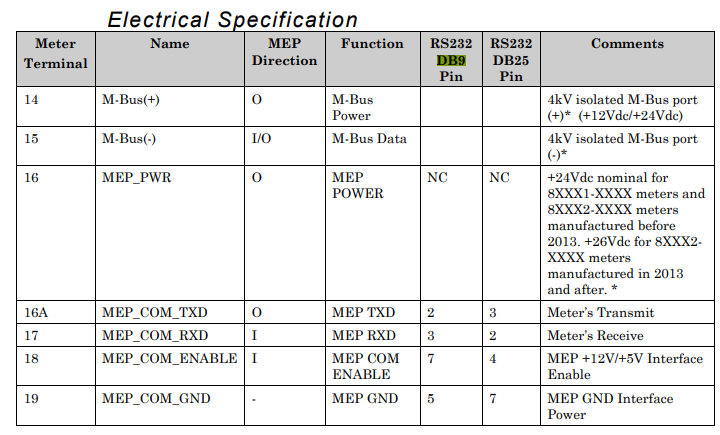
At least we found this in a manual forwarded to us (although it is marked CONFIDENTIAL), but it does not tell us how the pins are routed to the 6 pin header:

M-Bus and MEP screw terminals behind the sealed cover on the Echelon/NES meters

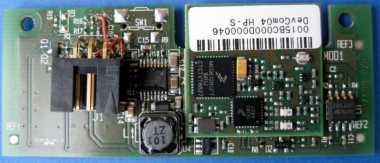
Inspired by Thomas – we pushed harder – and (we cannot reveal from where) “suddenly” we had a prototype of the so-called “Izar/M-Bus PCB”. This was really a breakthrough. We immediately tested it in a couple of Echelon meters, which immediately recognized it with a small “M” in the display. And according to the available documentation – that is the “icon” for a MEP device (Multi-purpose Expansion Port) and not a M-Bus device… So Izar/M-Bus appears to have been mis-information… This is in fact a MEP/ZigBee PCB…

MEP / ZigBee module

Anyway – with a working PCB to reverse engineer and the above table, we soon found this pin-out of the “secret” 6 pin header (pins from top left to bottom right as seen when you look at them in the “secret” drawer in the meter:

  • Pin 1: MEP_COM_GND (ground)
  • Pin 2: MEP_COM_ENABLE (+5v or +12v on this pin will tell the meter to enable the interface)
  • Pin 3: MEP_COM_RXD (meter serial receive pin)
  • Pin 4: MEP_COM_TXD (meter serial transmit pin)
  • Pin 5: MEP_PWR (+24/+26VDC power from meter. Note: This is max 1watt!)
  • Pin 6: Not used / no connection

And also the above table confirms that MEP is a quite simple serial (RS232) based protocol.

Based on this we were soon able to capture communication with a small PCB between the meter and a couple of USB RS232/DB9 interfaces (like these)… We soon realized the serial communication parameters 9600,n,8,1 and to our surprise the protocol seemed binary and far more complex than expected…

During our early research we stumbled across this GitLab project. Looking at it, it seems MEP is a kind of clear text protocol with quite simple commands, but we soon realized this was another “rabbit hole” or we simply do not understand the code in the project. Anyway – it seems we cannot get any usable knowledge from that project.

We tried to research the protocol, but the only stuff we could find was that Echelon at some point sold training in this, and then references to this document “Echelon Corporation (2010c) MEP Device Developer’s Guide, Version 078-0372-01G, San Jose.”.

We also tried to reverse engineer it based on the recorded packages sent and received between the MEP/ZigBee module and the meter – but this was clearly outside our skillset. We had NO idea what was sent and received…

We were giving up after “hitting this wall” of the secret MEP protocol…

…and in our desperation we reached out to what we thought was the most unlikely party to help us (no, not N1) – stay tuned for our next post :-)…

Echelon/NES Smart Meters – the beginning

Echelon logo

This will be a multi part post as we spent the last year in collecting all the pieces of the puzzle to connect to and get data from our Echelon Type 83331-3IAAD meter. Like others trying to do this, we hit a lot of “red tape”, lack of knowledge from involved partners, confusions and even deliberate mis-information. But in the end we actually succeeded and now have all the pieces to complete the puzzle. We are working on finalizing a tinker solution, but are still under a NDA (Non-Disclosure Agreement from the current technology owner NES (Networked Energy Services). Luckily NES is working hard on releasing the required information as open source through OSGP Alliance (OSGP is short of Open Smart Grid Protocol). We have been promised this will happen “soon” (and have received drafts of the documents – so we are pretty sure it will happen soon). This is the start of the process that hopefully will make it possible to share the knowledge with you.

Shoutout to the guys and girls at the just finished sommerhack.dk: Thank for a great gathering and for listening to our Echelon stories… And an additional shoutout to Georg Sluyterman, who is running BefriDinElmåler.dk and is beta-testing our prototype in his Echelon Power Meter.


For a few years Graves and Gert have been trying to create a solution to read out our power consumption from our so-called Smart Meter: Echelon Type 83331-3IAAD.

Initially we hoped to be able to read the meter data through the IR (Infra Red) “eye” on the meter. This seems to be possible on meters from other manufacturers, (i.e. Kamstrup) and HAL9K even shared the required hardware for it.

We spent quite some time on this “rabbit hole”, but eventually found internet sources mentioning this interface is encrypted and you need to obtain a key from your power network provider to decrypt this interface on our Echelon meter. It seems this interface is used during production of the meter and have a bunch of features. Unfortunately our guess is also that the security of this port has been compromised as our power network provider N1 simply refuses to hand over the required keys. We have not found any real evidence of this, but if you have any information regarding this, please enlighten us in the comments :-).

At this point in time we reached out to our power company, which referred us to N1. We started pushing N1 for information on how to integrate with the meter (as you are supposed to be able to do this by law) and keys for the IR port, but is seemed like a dead end. Others have tried with no success – and we did expect kind of the same result… We thought that the guys at N1 withheld information from us on purpose… Today we know it is more likely they simply did not have much usable information and only knew that they would/could not hand out the IR encryption keys.

The obvious next step was to start counting the LEDs blinking on the meter. Other have successfully implemented this very simple interface, and we know it is possible to follow the power consumption by counting the LED blinks, and maybe even get the real time consumption by measuring the blinking frequency. Although this will work and we also went down this path for a while, it is not really a nice solution. You cannot read the exact counter shown on the meter and get other available information etc.

During our research we also found that our power network provider (N1) at least at some point might have offered an electrical interface pulsing the same way as the LED. Apparently you had to rent it for a monthly fee… In other words, not for tinkeres like us….

The ironic part is that the meter in fact have screw terminals for different interfaces (M-Bus and something called “MEP” – we’ll discuss that in our next post), but on our meter they are hidden behind a protected/sealed cover. And you are NOT allowed to break the seals in any way. It is simply illegal for consumers to do that in Denmark.

At this point in time we kind of gave up… Apparently it is not possible to get to the meter data in a real usable/electronic way. And N1 is not providing much help….

…or rather – we gave up for a while – stay tuned for our next post :-)…

Echelon/NES Smart Meters – dabbler.dk rebooted

We have been quiet for a while. Not because we have not been tinkering, but because we’ve been very busy tinkering.

To be precise we’ve been tinkering with our Echelon type 83331-3IAAD Smart Meters (power meters) and how to read out the consumption in a nice way…

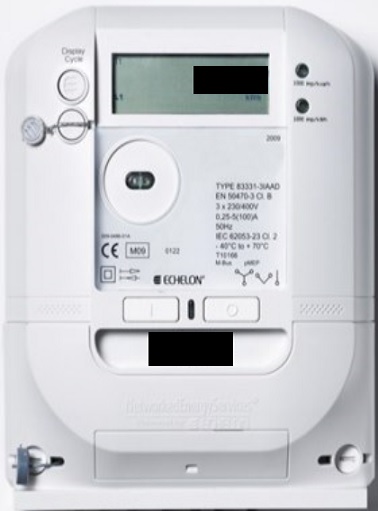
Echelon type 83331-3IAAD Smart Meters (power meter)

At the Danish gathering Sommerhack.dk 2021 we’ll be presenting a session (Friday @ 16:00 CET) about our process and the current state of this project. See you there?

It is yet to be determined how much details we can share because we are currently under NDA (Non-Disclosure Agreement) with the product owner NES (Networked Energy Services) about the details… But that will hopefully change soon.

Are you interested in communicating with your Echelon Smart Meter?

Stay tuned for more info. on how to do it… coming to dabbler.dk very soon now…